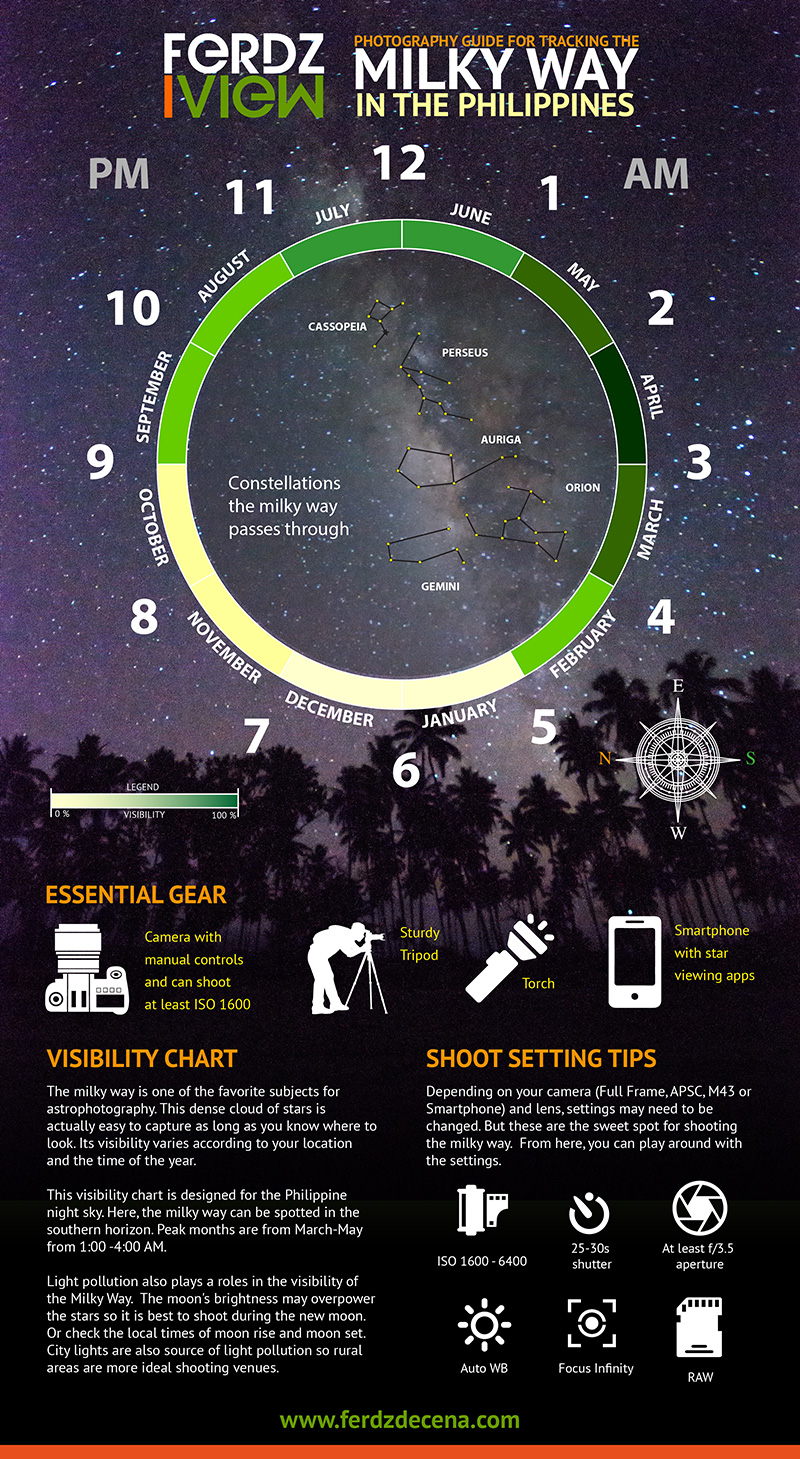
Astrophotography is one of the exciting fields of photography. It takes patience but seeing the night sky pop out of our pictures is reward enough. The milky way is one of the favorite subjects. This dense cloud of stars is actually easy to capture as long as you know where to look. Its visibility varies according to your location and the time of the year.
Milky Way Visibility Chart
This milky way visibility chart is designed for the Philippine night sky. While the milky way moves around the horizon, here, the milky way can be clearly spotted in the southern region. Peak months are from March-May from 1:00 -4:00 AM and can be spotted on the southern horizon.
Light Pollution and Moon Phase
Light pollution also plays a roles in the visibility of the milky way. The moon’s brightness may overpower the stars so it is best to shoot during the new moon. Or check the local times of moon rise and moon set and shoot when the moon is gone. You can also check out these apps for checking the current moon phase:
City lights are also source of light pollution so rural areas are more ideal shooting venues.
Total darkness is the ideal condition for viewing the milky way. The eyes can get accustom to the darkness and the milky way can be seen with the naked eye. I would also recommend using a flashlight with red light when tinkering settings on your camera.
Shoot Settings Tips
Depending on your camera (Full Frame, APSC, M43 or Smartphone) and lens, settings may need to be changed. The settings suggested in the infographic are the sweet spot for shooting the milky way. You can play around with the settings from here.

Apps for viewing the Milky Way
There are a number of applications already available to help locate the milky way. On the desktop, Stellarium.org have a free software available for MAC, Windows and Linux. It’s a powerful tool for viewing the milky way and simulating conditions in different times of the year.
There are also a number of apps in Android and IOS. Some are free but the good ones with extensive control can be bought.
- Star Chart for IOS and Android. (Free)
- Sky Guide for IOS (Free)
- PhotoPills for IOS (US$ 9.99)
- Stellarium for Android (Php 115)
Post-Processing
Shooting the milky way can be exciting and addicting but that is just part of the process. It is important to get the ideal shots first so its easier to work on processing the photo. We recommend shooting RAW so there would be a lot of headroom to work on the noise, shadows, highlights and white balance. Once you feel you have taken a good photo of the night sky it’s time to work on the photo to enhance it and make the milky way pop out of the picture. We’ll save that for another post in the future.
The post Infographic: Tracking and Shooting the Milky Way in the Philippines appeared first on FerdziView.